Choosing the right cable size for a residential circuit is one of the most important parts of safe electrical design. A cable that is too small can overheat, waste energy, cause excessive voltage drop, and create a real fire risk. An unnecessarily large cable may still work, but it increases installation cost and can make the system less economical than it needs to be. In residential work, good cable sizing is not just about making the circuit operate. It is about ensuring the circuit operates safely, efficiently, and in compliance with accepted wiring practices.
As an engineer, I have seen many people treat cable sizing as a simple rule of thumb. They might say 1.5 mm² for lighting, 2.5 mm² for socket circuits, and 4 mm² or 6 mm² for heavier loads. While those common sizes are often seen in homes, proper cable selection should never stop at memorizing numbers. The correct cable size depends on the current, the type of load, the cable run length, the installation method, the ambient temperature, grouping with other cables, and the allowable voltage drop. Once you understand these factors, cable sizing becomes much more logical and much less confusing.
In this guide, I will explain how to choose cable size for residential circuits step by step. The goal is to make the process clear for students, junior engineers, technicians, and even homeowners who want to understand how electrical decisions are made in real projects.
Why does cable size matter in a house?
Every residential circuit carries current from the distribution board to lighting points, sockets, appliances, or other connected loads. As current flows through the conductor, the conductor resists that current to some degree. That resistance causes heating and also creates a voltage drop along the cable length. If the conductor is undersized, both problems become more serious.
The first problem is overheating. Electrical cables have insulation, and that insulation has temperature limits. If the conductor gets too hot under normal operating conditions, the insulation ages faster and may fail. This can damage the circuit and increase the chance of faults or fire. The second problem is voltage drop. If the cable is too small for the current and length, the voltage at the load end falls too much. Lights may become dim, motors may start poorly, and appliances may not perform properly.
A correctly sized cable must therefore do three things. It must carry the design current without overheating. It must keep the voltage drop within acceptable limits. It must also coordinate properly with the protective device, such as the circuit breaker or fuse.
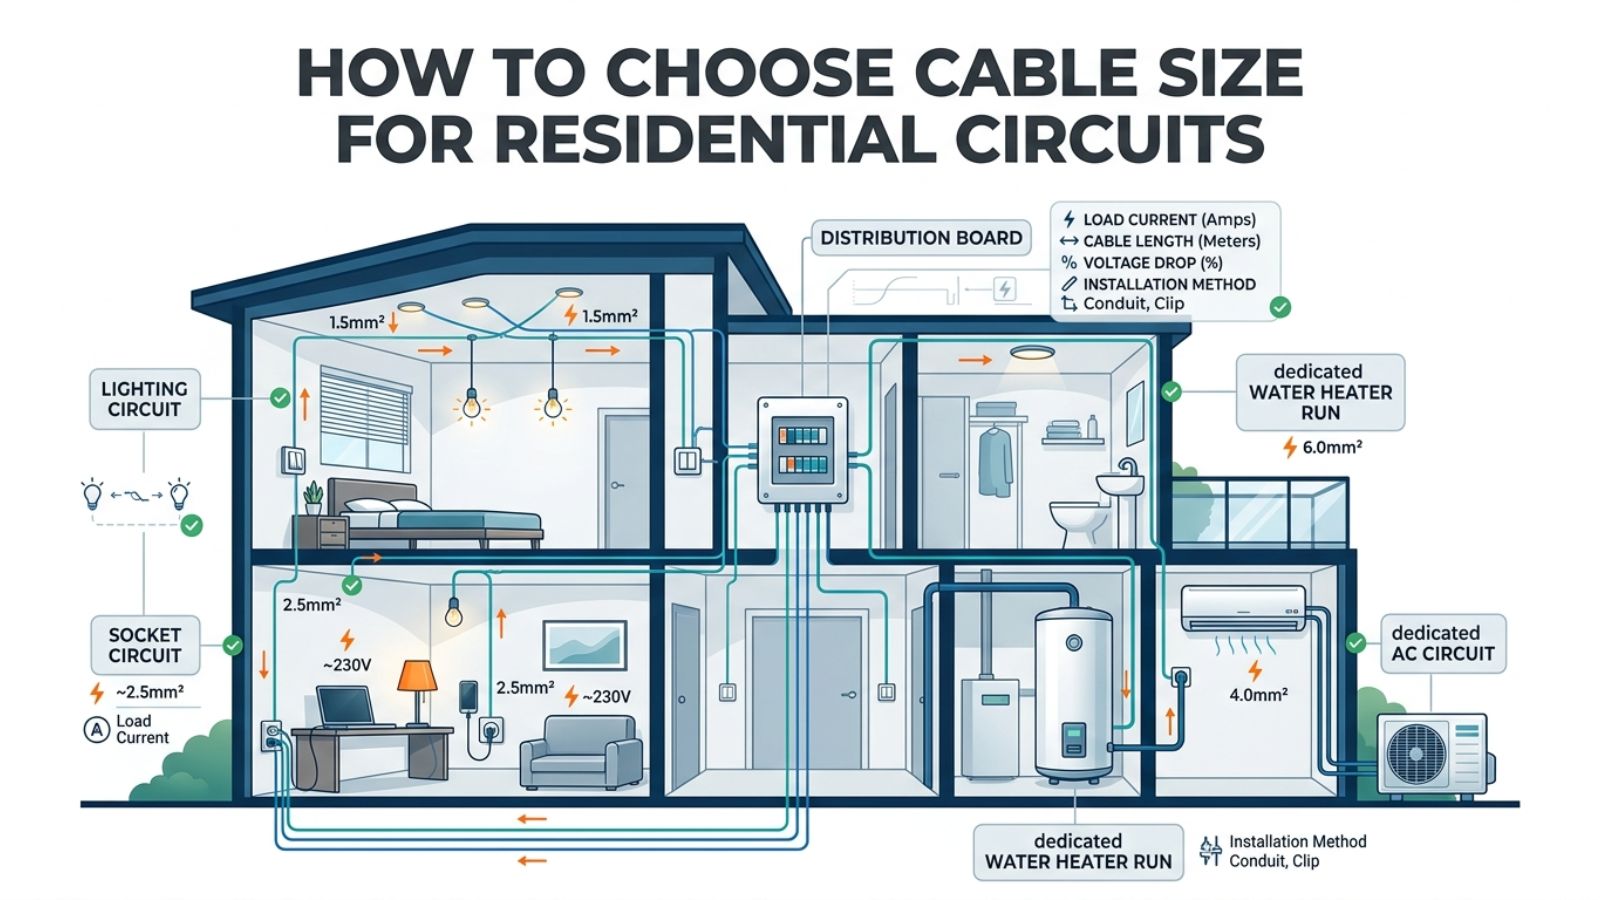
Step 1: Identify the type of residential circuit
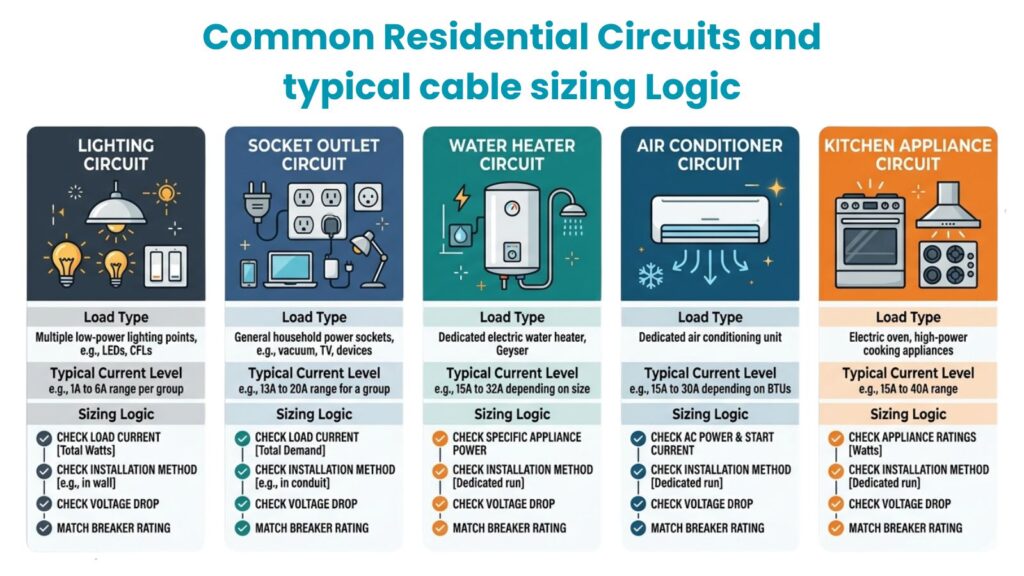
The first step is to understand what kind of circuit you are sizing. In a typical house, circuits are usually divided into categories such as lighting circuits, socket outlet circuits, water heaters, air conditioners, kitchen appliances, cookers, pumps, and sometimes dedicated circuits for equipment like washing machines or ovens.
The cable size for a lighting circuit will usually be smaller because lighting loads are generally lower. Socket outlet circuits may need a larger cable because people can plug in multiple devices. Dedicated appliance circuits often require special attention because some loads are continuous, some have high starting current, and some are located far from the distribution board.
This matters because cable selection is always tied to the real load and how that load behaves in practice.
Step 2: Calculate the design load current
Once the circuit type is known, the next step is to calculate the expected current. This is the starting point for sizing any cable.
For a single-phase residential circuit, the basic current formula is:
Current (I) = Power (P) / Voltage (V)
If the load is specified in watts and the voltage is known, you can estimate the current directly. For example, if a water heater is rated at 3000 W and the supply is 230 V, the current is:
I = 3000 / 230 = 13.04 A
That means the cable and protective device must safely support at least that current. In practice, designers also consider whether the load is continuous, whether future expansion is likely, and whether diversity applies.
For example, not all socket loads in a house operate at full rated load at the same time. That is why diversity may be considered in larger designs. Still, for smaller residential circuits, especially dedicated appliance circuits, it is often safer and simpler to size based on the actual expected load.
Step 3: Choose a provisional cable size based on current capacity
After calculating the current, the next step is to choose a preliminary cable size based on current-carrying capacity, also called ampacity. This is the amount of current a cable can carry continuously without exceeding its temperature limit.
In residential installations, some common copper cable sizes are 1.5 mm², 2.5 mm², 4 mm², 6 mm², and 10 mm². Depending on local wiring standards and installation conditions, these sizes are commonly associated with typical uses. For instance, 1.5 mm² is often used for lighting circuits, 2.5 mm² for socket circuits, 4 mm² or 6 mm² for water heaters or small cookers, and larger sizes for submains or heavy loads.
However, this is only a starting point. The actual current capacity of a cable depends strongly on how it is installed. A cable clipped directly to a wall can carry more current than the same cable buried in insulation or grouped tightly with several other loaded cables. This is why tables in national standards are always based on the installation method.
Step 4: Check the installation method
This is one of the most overlooked parts of residential cable sizing. People often assume that cable size depends only on current. In reality, the installation method can change the allowable current significantly.
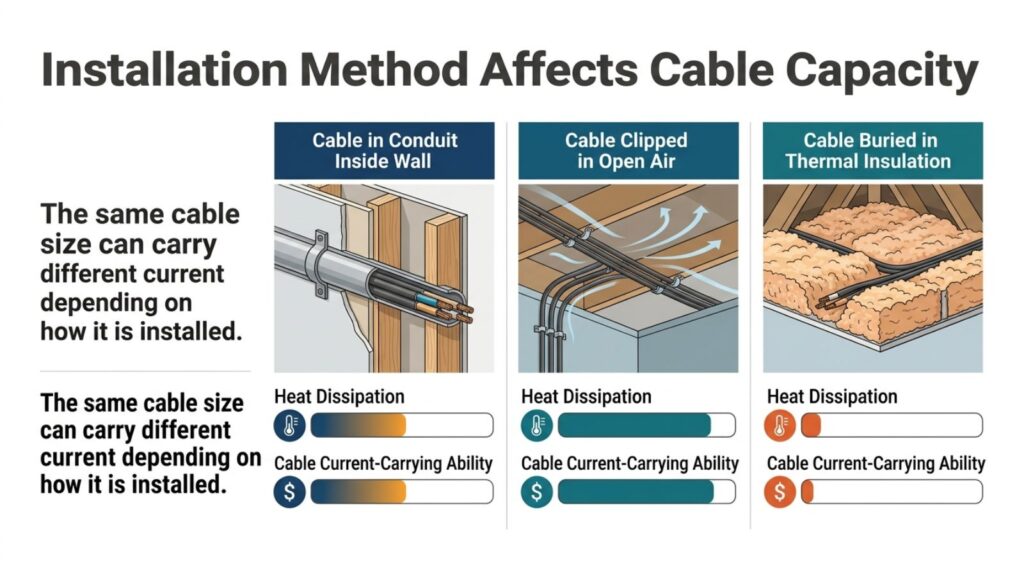
A cable installed in a conduit inside a warm wall does not dissipate heat the same way as a cable run in open air. A cable buried under thermal insulation may carry much less current safely because the heat cannot escape easily. Similarly, multiple cables grouped in the same conduit or trunking heat each other and reduce individual current capacity.
From a practical engineering point of view, this means you should never choose a cable size from memory alone. You need to know where the cable will run and how it will be installed. In residential projects, common installation methods include cables in conduit, cables concealed in plastered walls, cables above ceilings, and cables run in insulated roof spaces. Each condition affects derating.
Step 5: Apply correction factors
After selecting a provisional cable size, correction factors must be considered. These are adjustments used when actual site conditions differ from the standard conditions in the cable rating tables.
The most common correction factors in residential work are ambient temperature, grouping, and thermal insulation effects. If the cable runs through a hot ceiling or in an outdoor environment with elevated temperatures, its current-carrying ability reduces. If several loaded circuits are grouped, each cable may need to be derated. If the cable is surrounded by insulation, heat buildup becomes a serious issue.
This is where many bad installations begin. Someone selects a cable because it seems large enough for the load current, but after derating, the effective capacity is no longer adequate. Good design means checking the real conditions, not the ideal ones.
Step 6: Check voltage drop
Even if a cable can carry the current safely, it still might not be suitable if the voltage drop is too high. Voltage drop is the reduction in voltage between the supply end and the load end of the cable. In homes, excessive voltage drop can lead to dim lighting, weak motor performance, overheating in appliances, and inefficient operation.
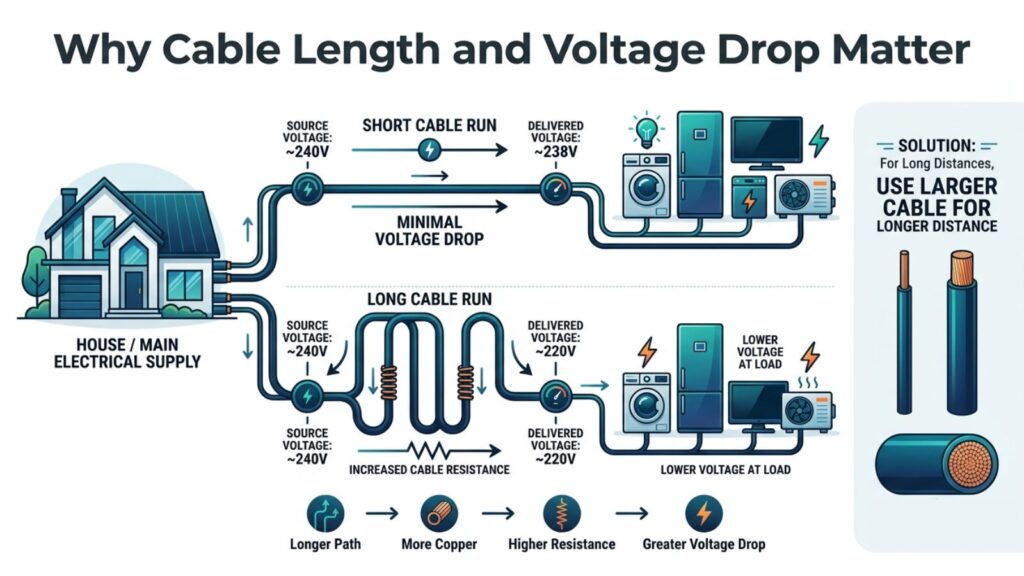
Voltage drop depends mainly on three things: current, cable resistance, and length. The longer the cable run, the larger the voltage drop. This is why distance matters a lot in cable sizing, especially for outdoor loads, garages, pumps, and detached buildings.
In simple terms, a longer circuit usually needs a larger cable, even if the load current stays the same. This is one of the biggest reasons why field experience matters. Two circuits with the same load current may not use the same cable size if one run is short and the other is much longer.
For residential design, local codes often specify a maximum acceptable voltage drop for final circuits. The exact limit depends on the standard being followed. The principle is always the same: the load should receive adequate voltage for safe and proper operation.
Step 7: Coordinate the cable with the circuit breaker
The cable and the protective device must work together. This is a basic safety principle. The protective device should disconnect the circuit before the cable overheats under overload or fault conditions.
In practical terms, the cable current rating should not be lower than the rating of the circuit breaker after all correction factors are considered. For example, if a 20 A breaker protects a cable, that cable must be capable of carrying 20 A safely under the real installation conditions. If not, the breaker may allow too much current for too long before tripping, and the cable can overheat.
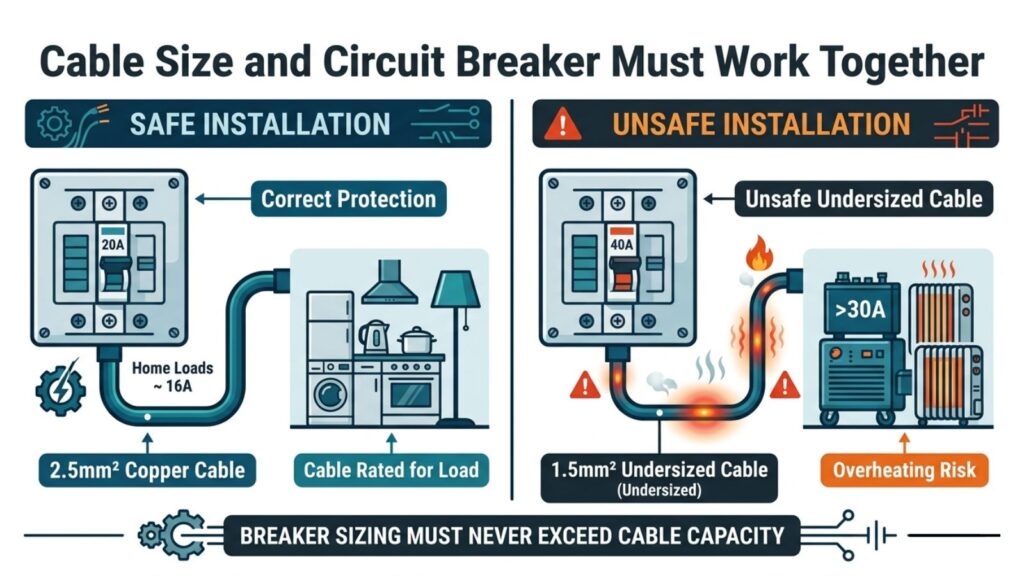
This is why cable size and breaker size must never be chosen independently. They are part of one protection system.
Step 8: Consider starting current and special loads
Not every residential load behaves like a simple heater or lamp. Some appliances contain motors, compressors, or electronics that behave differently during startup. Air conditioners, water pumps, refrigerators, and similar equipment may draw higher current briefly during starting. While the starting current may not always force a larger cable, it should be considered when selecting both cable and protective device.
In homes, this is especially important for air conditioning circuits and motor-driven equipment. A cable that is marginally sized may experience unnecessary heating if the load starts frequently or runs for long periods at a high current.
A practical example of a lighting circuit
Let us take a simple lighting circuit in a house. Assume the total connected lighting load is 1200 W on a 230 V single-phase supply.
The design current is:
I = 1200 / 230 = 5.22 A
At first glance, this is a small current, and a 1.5 mm² copper cable may appear suitable, which is common for lighting circuits. But the designer should still check the installation conditions. If the cable is run inside conduit in a normal wall and the circuit length is modest, 1.5 mm² may be perfectly acceptable. If the run is very long or routed through a heavily insulated roof space, the voltage drop and derating should be checked carefully.
This example shows an important lesson. A common cable size may be correct, but it becomes correct only after checking the real conditions.
A practical example of a socket or appliance circuit
Now consider a 3 kW water heater on 230 V.
I = 3000 / 230 = 13.04 A
A 2.5 mm² copper cable may be enough in some cases, but suppose the cable run is long and passes through a hot ceiling space with other cables grouped nearby. In that case, 2.5 mm² might no longer be the best choice. The designer may move up to 4 mm² to control both temperature rise and voltage drop. That decision is not guesswork. It is the result of engineering checks.
This is why experienced electricians often say that load current starts the process, but it does not finish it.
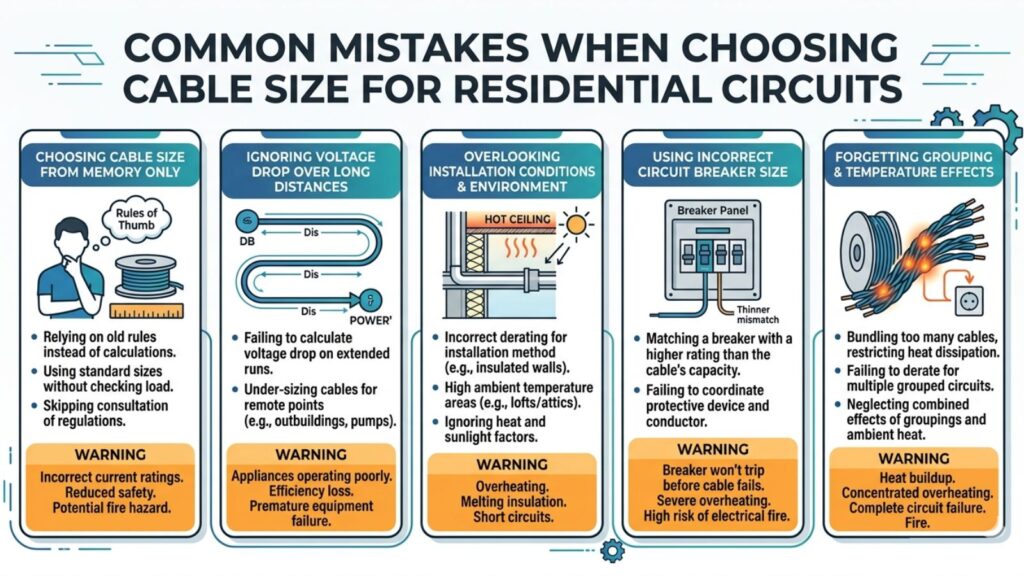
Common mistakes when choosing cable size for residential circuits
One very common mistake is choosing cable size from the breaker rating alone. A 20A breaker does not automatically mean a 2.5 mm² cable is always acceptable. Installation conditions may require a larger size. Use this wire size calculator to avoid mistakes.
Another common mistake is ignoring cable length. This happens often in garages, garden circuits, gate motors, and outbuildings. The circuit works at first, but the voltage at the far end is lower than expected, especially under load.
A third mistake is forgetting the effect of insulation and grouping. In modern houses, cables often pass through ceiling insulation, service shafts, or conduit bundles. These conditions reduce heat dissipation and change the cable rating.
Another serious mistake is mixing convenience with design. Some installers use whatever cable is available rather than what the circuit requires. That is never a good practice. Electrical design should always be based on calculated need and code compliance.
Copper vs aluminum in residential installations
In most residential circuits, copper is the preferred conductor material because it has better conductivity, better mechanical strength, and more reliable terminations for small branch circuits. Aluminum may be used for larger feeders or service conductors in some systems, but for internal final residential circuits, copper is more common and usually more practical.
This matters because cable size tables are different for copper and aluminum. You cannot assume that the same cross-sectional area will carry the same current in both materials.
The role of local electrical codes
No matter how experienced you are, cable sizing in actual projects must follow the local electrical code or standard. That may be NEC, IEC-based regulations, BS wiring rules, or another national standard, depending on the country. These standards provide tables, correction factors, voltage drop limits, and protection requirements.
A simple way to think about cable sizing
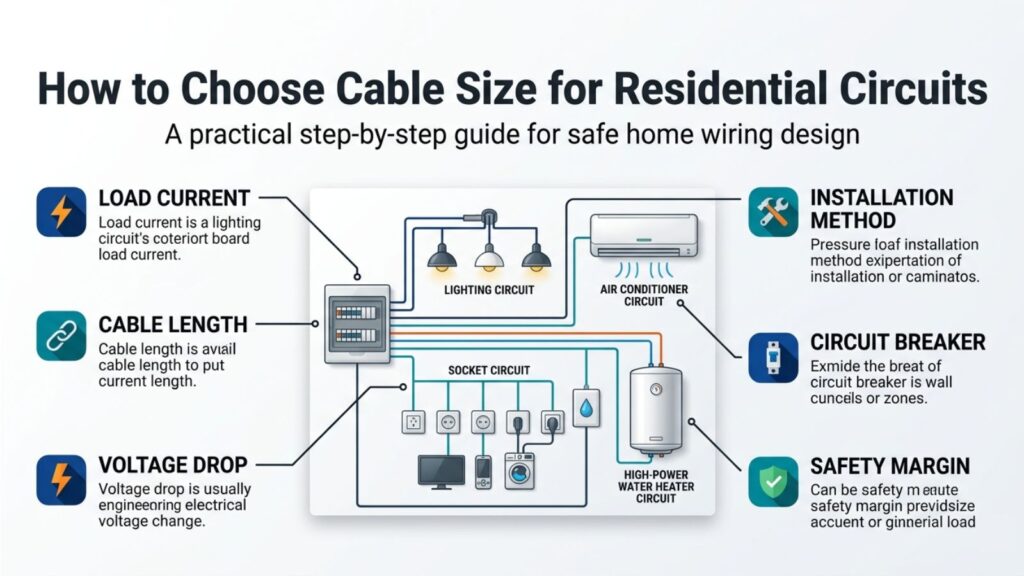
If you want to remember the process clearly, think of cable sizing as answering five questions.
First, how much current will the load draw?
Second, how will the cable be installed?
Third, will real site conditions reduce the cable rating?
Fourth, is the voltage drop acceptable for the circuit length?
Fifth, is the cable properly protected by the selected breaker or fuse?
If you can answer those five questions properly, you are already thinking like a good electrical designer.
Final thoughts
Choosing cable size for residential circuits is not difficult once you understand the logic behind it. The key is to stop thinking of cable size as a memorized number and start treating it as a design decision based on load, temperature, installation conditions, voltage drop, and protection.
In many homes, standard cable sizes work well because the loads and layouts are familiar. But good engineering does not depend on habit alone. It depends on verification. A properly sized cable improves safety, reduces overheating risk, maintains voltage quality, and supports long-term reliability of the installation.
If you are a student, this topic is worth mastering because it connects theory directly to real design. If you are a technician or practicing engineer, it is one of the clearest examples of how small design decisions can have major safety consequences. And if you are a homeowner trying to understand residential wiring, the main takeaway is simple: cable size should never be guessed. It should be selected carefully and checked properly.